Opencart online store and stock management
https://demo.schoost.com/store
Entrance
You can find information about the use of online shopping infrastructure, which is widely used in the world and developed to integrate with many institutions. Stock tracking makes it easier for you to keep track of your products by using many features such as best selling products, discount definition, campaign, marketing, sales pricing.
We will only use the stages of identifying your products and tracking stock.
In order to receive online payments (e.g. paynet virtual pos), we need to configure it. "Paynet" is a payment institution.
You can access the detailed explanation of the whole module from the relevant link. http://docs.opencart.com/en-gb/introduction/
Getting started
You can easily configure OpenCart to start selling from your online store. It is divided into two as Administrator and Customer page. We will make our basic settings with the admin page to do the "stock" tracking. If we want to make transactions with possible online sales and credit card payments in the future, this system will create the infrastructure for you.
We will complete our transactions by using the menus of the admin page that we only need for stock tracking.
Related link http://docs.opencart.com/en-gb/getting-started/ for detailed explanation
Dashboard
You can manage all modules from the main screen and you can also see the instant sales, the number of customers. These are briefly as follows.
- Menus
- Sales figures, your registered customer
- Incoming sales requisitions, approved summary reports
- You can see the details from the order line and access the relevant actions from the settings.

Example scenarios and processes
You can find the store's easy "stock tracking" section below. Since some of the tabs and sub-items of this section belong to advanced stock details (ISBN, weight, packaging measurements, etc.), that is, to the store, you will be able to access the extensive narrative links from within this document, although they are not detailed below.
"Store" should be defined for stock tracking, for example "SmartClass". You have made settings such as location Istanbul, time, units, etc.
Then
In the "Musical Instruments" category,
$ 50 unit price,
50 Flutes,
You have defined it in 3 different colors and stock quantity. Your stock is now ready. You can now track your stock by making sales. When sold, each product will automatically be deducted from the stock separately.
| Store | SmartClass |
|---|---|
| Category | Musical Instruments |
| Product | Flute |
| Unit Price | $ 50 |
| Custom | 50 pcs |
| Red | 10 pcs |
| Yellow | 10 pcs |
| Green | 10 pcs |
On the product identification screen, the color is an example visual of entering the stocks.

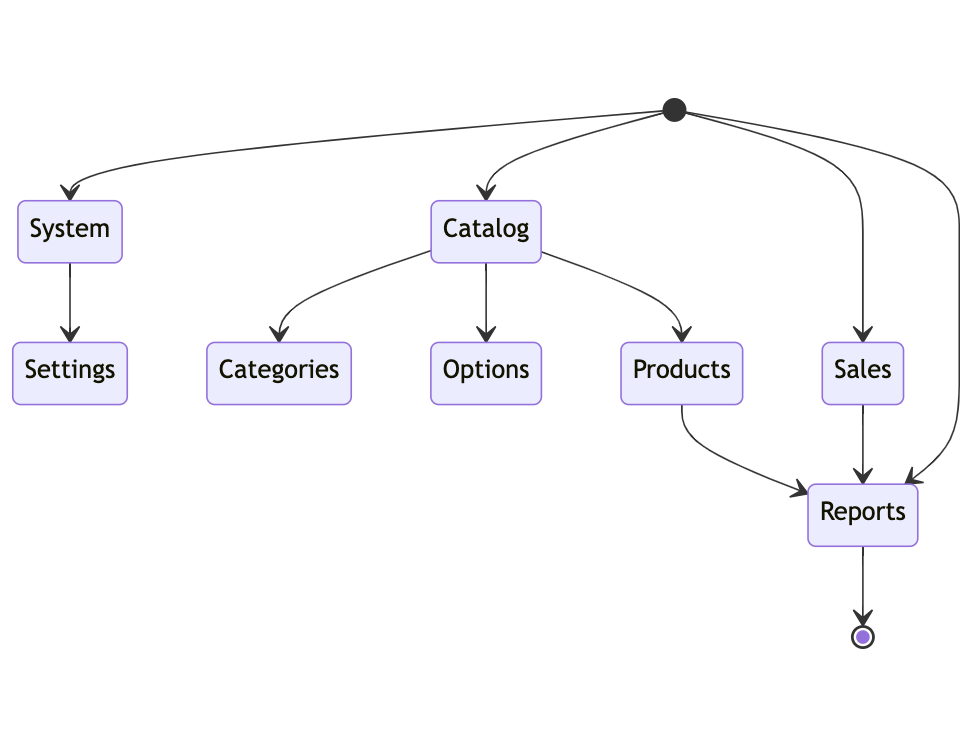
Flow
We will carry out our stages according to the diagram.

Sets
It is necessary to complete the following settings by specifying a store name for the "stock tracking" to be done in the first stage.

- General: In the Meta Title, you can enter "Tan Sağtürk Academy".
- Store: Store name, store owner, address, email and phone information will be entered.
- Image: You can upload a logo and icon.
- The store owner's email or the store's general email to be used for email notifications sent by OpenCart.
- You can change information such as country, currency, weight
Do not forget to complete step (4).
For detailed explanation http://docs.opencart.com/en-gb/system/setting/general/
Now that you've defined the options, you can move on to the next step.
Defining categories
Stock and Sales transactions are completed by creating categories such as books, ballet clothes, musical instruments and then adding products to them.
You can start defining your category with selection (2) and edit it later in (3).

You just need to enter the following information
- General:
- Category Name : Musical Instruments
- Metadata: Musical Instruments
We recommend that you fill in the description fields in preparation for using the online store.
- Data:
- Add an image appropriate to the category. (Preferably)
For detailed explanation http://docs.opencart.com/en-gb/catalog/category/general/
The category has been defined. You can proceed to the next stage.
Definitions in the "Options" menu
In this area, you make definitions such as size, color, size once . In the example below, you can specify the category title as "Colors", and under it you define yellow, red, green, pink, blue as adding according to your number of needs.
After the definition, when defining a new product, we will not define the color repeatedly, but we will be able to choose the color easily. (Will be explained in detail below)

How to make the definition of the category "Colors"

Once you have defined this template, you will now always be able to use this option when defining a "new product".
You can perform your operations in order.
(3) Let's write "Colors"
In this example (4) we will select "radio".
(5) can be left blank,
This option makes it appear in the top row. If you use more than one option (size, color) when defining a product, then if you type 1, the size will be on top, and if you type 2 in colors, it will appear below the size.
(6) You can choose your colors ( + )
A more limited definition can also be made by saying "Block Flute" instead of the name "Colors".
In the image below you can see an example of a radio button and the view in the store if it opens to customers

Now that you've defined the options, you can move on to the next stage
Product Identification
You can identify a flute of 50 pieces that will be in stock. (1 and 2 are selected)

Areas to be organized,
- General:
- Product Name : Block Flute
- Metadata : Block Flute
- Data:
- Model: Block Flute
- Price / Price: 50
- Quantity / Quantity: 50

- (2) you enter your sales price
- (3) Your current stock quantity is entered
- (4) If you type 3, the customer will not be able to buy it from the store under that quantity!
- (5) Stock cannot decrease or decrease as the product is sold, that is, it remains constant.
- (6) You determine on what date it will appear on sale in the store.
In the table that follows,
- Link: Select "Musical Instruments" from the categories. Your product will now appear under this category.
- Option: This field needs to be defined first from the Products > options field. We choose from what we have already defined above as the Block Flute. We detail it just below.
For example, if you want the flute to be sold in 3 different colors, you must define the colors in advance from the options menu. This way, for individual products, you won't be repeatedly entered from your product page.
Entering sub-options when defining products (.. Option tab)
We have already defined five colors called "Colors". But we did not enter the color stock quantity. If you want, if you say 50 TL in addition to your main price of 50 USD , our red flutes can be sold for a total of 55 USD

Option (2);
- If your option does not appear, enter the first three letters in the box
- You can offer more options by adding ready-made options such as Text, Time, Date, Checkbox, Radio, Size, Textarea, Select, File on this screen if necessary.
(2) "Colors" is selected. (3) With the color options added
The stock quantity is entered. (If there are 10 in red, enter 10)
Does it fall out of the main inventory as it is sold (by default, "yes" comes in)
The default of $0 can remain, but the price can be entered. (adds when selling at the main price. So if the product is 50 TL, it adds the color difference on top)
(4) is recorded.
Your first identified product stock was Block Flute 50 pieces, for example, you made sales and the product dropped to 30 pieces. You went into the product and wrote 40 pieces of red from the color stock. Manually increasing/decreasing does not change the main inventory figure. Because the main product continued to decrease as it sold. Enter the main screen of the product and update your stock to 70 pieces.
For detailed explanation http://docs.opencart.com/en-gb/catalog/option/
You have defined the product. You can proceed to the next stage.
Making a sale
For the sale, your customer must be added. This user is the customer, not the admin/administrator who manages the system. This is because we want us to do the sales ourselves as managers. If the online store was open, the customer would carry out its registration.
You only need to enter Customers, General > Address, > Customers, once. So now you can perform sales in 1 minute just by selecting this user in the sales step below.
We will make the sale as admin / administrator. Thus, we will be able to drop the product from stock. Our sample product is 50 pieces, we will use Block Flute.
If you open the online store to your customers, you only need to give your consent if the payment has arrived.
(3) You can start by selecting.

The following (4) customers are then selected. All the information will come to you because you entered it before. If you enter a manual customer information yourself, unfortunately it will not be saved on the customers page. You will have entered a sales record only for that person.

From the products (2,3,4) is selected and added with (5).

(Tab 4) Mandatory fields of the payment details are entered.
(Tab 5) In total, the "payment method" is selected, applied and recorded to complete the sale.

If the sale appears to be in pending/pending status, you can finish the transaction by taking it to complete.
The sale was made. It also fell out of stock. You can proceed to the next stage.
Report
Observe that the quantity from the stock area has decreased to (49). (Catalog > Products)

Your inventory reporting is finished.
CHECKLIST: What to do in order to track stock
- Adjusting settings (Store name, Currency)
- Categorization (For products in stock... Musical instruments, Books)
- Define product options (size, color)
- Identifying products (Block Flute, Tutu, picture book, shoes, jersey)
- Make the first sale
- View stock report
- See general reports (preferably)
- Take a backup (preferably)